
How to measure belt tension: three methods and when to use each
Belt drives fail for a short list of reasons, and tension sits near the top of that list. Correct tension occupies a narrow band. Too little, and the teeth ratchet across the pulley; too much, and the shaft bearings absorb what the belt cannot. Both errors shorten service life. Neither one is visible from outside the machine until a tooth strips or a positioning error shows up in the finished part.
The sections below cover what incorrect belt tension does to a drive and how soon a new belt needs rechecking. Then come the three field methods for measuring tension — hand feel, force-deflection, and vibration frequency.
Importance of properly tensioned belts
A timing belt transmits torque through tooth engagement rather than friction, so tension is not there to grip the pulley. Tension keeps the belt seated in the tooth grooves and holds the free span stiff enough to resist the reversing loads of a start-stop cycle.
A loose belt gives up that seating first. Under acceleration the belt climbs the tooth flank and skips, which throws off position on any indexing or gantry application. Slip generates heat at the tooth root, the drive runs louder, and the free span whips between pulleys. Wear then accelerates on the belt and the pulley teeth together.
Overtensioning moves the damage somewhere less obvious. The extra load passes through the belt cords into the pulley shafts and the bearings that were never sized to carry it. Running temperature climbs, the motor draws more current to turn the same load, and the tensile cords fatigue early.
Bearings punish that error steeply. One published analysis compared two tension settings on a 186 kW (250 hp) fan drive: a generic table value (41 lbs per strand for a pull of nearly 6,000 lbs), and one calculated for the power actually transmitted (between 18 and 22 lbs per strand for a pull of about 2,000 lbs). The table value cut bearing life by 97%.
The study highlights a key lesson: proper belt tension is not universal and relies heavily on unique application factors that standard tension tables do not reflect.
What type of belt are you tensioning?
Two belt families cover most industrial drives, and they move power in opposite ways.
A V-belt wedges into a grooved sheave and drives by friction. Friction sets both its uses and its limits. V-belts run fans, pumps, blowers, and compressors, where tolerance for shock loads matters more than an exact speed ratio. A belt that slips under a jam also acts as a mechanical fuse for the driven machine. The cost is slip in normal running, which wastes power as heat and pulls output speed below the calculated ratio.
A timing belt (synchronous belt) carries load on molded teeth that mesh with matching pulley grooves. Nothing depends on grip, so the belt holds a fixed ratio and the output follows the motor turn for turn. Toothed belts are standard on linear actuators, gantries, and pick-and-place cells, where position matters more than forgiveness. They tolerate misalignment and shock loading less well than a V-belt, and a tooth that never seats fully will strip under load.
Tension does a different job in each case. On a V-belt it creates the friction that moves the load. On a timing belt it holds the teeth seated and keeps the free span from flexing.
How often should I check my belt tension?
No single interval covers every machine. A packaging line running three shifts, a laboratory gantry making short precision moves, and a warehouse conveyor drive wear their belts at completely different rates. Precision requirements set the rest. The tighter the positioning tolerance, the less tension drift a machine can absorb.
Most of a belt’s stretch happens early. Recheck one to two days after installation. By then the belt has seated in the pulley grooves and the tensile cords have taken their first load. Some maintenance schedules add a second check about a week later. After that, most schedules settle on a check every three to six months.
That cycle is built around V-belts, which lose tension as they wear into the sheave grooves. A timing belt holds its setting far longer, so a three-to-six-month check rarely produces an adjustment. Keep it on the calendar regardless — it will help catch tension loss before the teeth start climbing out of the grooves.
How does a belt tension meter work?
A belt tension meter does not read the force inside the belt directly. It measures a stand-in for tension: how far the free span moves under a known load, or how fast the span vibrates when plucked. The meter then converts that reading into a number you can check against a specification.
The two approaches handle that conversion differently. A force-deflection gauge reports the load it applied, and the operator compares that load against a deflection table from the belt or machine manufacturer. A belt frequency meter does the arithmetic itself. It combines measured frequency with span length, belt width, and mass per unit length to return tension in newtons or hertz.
How do you measure belt tension?
There are three primary methods, and they differ mainly by how much they lean on operator judgment. Hand checks rely on it entirely, force-deflection less so, and frequency measurement removes most of it. Accuracy climbs in that order, and so does the cost of the tension measuring device.
Measuring tension by hand
Press down on the center of the free span with a thumb and judge the deflection by feel. On a drive the operator knows well, this catches a belt that has gone obviously slack, and it needs no tool and no teardown.
Feel varies between operators, between belt widths, and between one span length and the next. Two people can call the same belt correct and wrong. Anything doing repeatable positioning, indexing, or synchronized motion needs tension inside a narrow specified range. A thumb cannot reliably achieve this. Treat hand checking as triage rather than a setting method.
Measuring tension using force-deflection
A force-deflection gauge applies the same principle as hand checking, but with a calibrated spring behind it. Set the gauge against the center of the free span and press until it reaches the specified deflection. The tool clicks to mark the end of the reading. Compare the force shown against the manufacturer’s table for that belt and span.
The gauge removes guesswork about how hard to press, which is where hand checking loses most of its accuracy. It does not remove geometry: the reading still depends on finding the true center of the span and pressing perpendicular to the belt. Accuracy lands between hand checking and frequency measurement, which makes it a reasonable middle option on drives with a published deflection specification.
Measuring tension using frequency
A sonic belt tension meter listens instead of pushing. Pluck the free span the way you would a guitar string, then hold the sensor near the belt. The meter reads the vibration frequency of that span. Higher tension raises the frequency, and the meter converts frequency to tension using the belt data entered beforehand.
Nothing in that sequence depends on operator strength or judgment. That makes frequency the most repeatable of the three methods, and the one to reach for on precision drives. Exact accuracy comes down to the specific meter. Check the published error figures before holding a reading to a tight tolerance.
Practical example
Measurement is one step inside a larger procedure. A walkthrough video on the drylin® ZLW belt-driven linear actuator runs the full sequence end to end. It covers reaching the belt, releasing the clamp, setting tension, taking the reading, and locking everything back down. Seeing the process on a real actuator closes the gap between knowing how a meter works and knowing where to put it on your machine.
The TRUMMETER belt tension meter
The TRUMMETER is a sonic belt tension meter built on a simple premise: if it vibrates under load, it can be measured. Belts are the common case, but the same frequency reading works on wire rope, cable, netting, and spring elements. That puts one tool across several maintenance jobs in a plant.
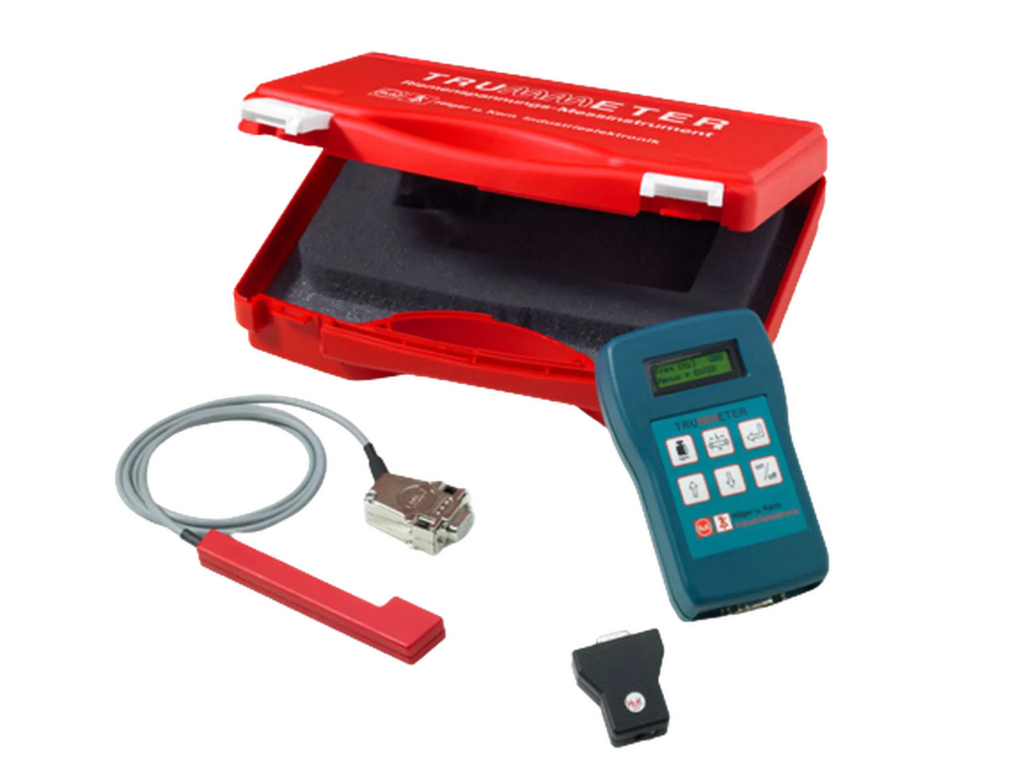
Access is often the harder problem. This is solved with an attachable probe that reaches the sensor into tight pulley housings and guarded drives. The belt does not have to be fully exposed to be measured. On a machine where the free span sits behind a cover plate, that is the difference between a reading and a teardown.
Buying one for yourself is simple. The TRUMMETER can be purchased directly from the RBTX Marketplace — the only marketplace in the United States that can make that claim. Add it to the cart and check out, with no RFQ, no sales consultation, and no waiting on a quote.
Closing thoughts
Tension is one of the few drive faults a person can correct in ten minutes with one tool. Bearings, shafts, and stripped pulleys are not. A quarterly check costs less than any part it protects, which is an unusual trade in maintenance work. Keep the meter near the machine rather than in a drawer across the plant.
Belt tension calculator
Already know your specs and just looking to quickly calculate belt tension? Use the tool below!