
Understanding changeover time and how to minimize it
In the packaging industry, changeovers are a necessity to handle the wide variety of packaging types and sizes. However, the goal of any packaging operation is to minimize changeover time as much as possible to maximize productivity and efficiency.
A non-functional changeover that brings the entire production line to a standstill is a nightmare that many people either know — or fear — because as we all know, downtime is money. But there’s no single way to make changeovers more efficient; a multi-faceted approach is required. Read on to learn about changeover time and some of the best ways to minimize it.

What is changeover time?
Changeover time in packaging is the time between the end of one production run and the beginning of the following run, which is marked by achieving the target production rate and product quality. This can range anywhere from just a few minutes to multiple hours long depending on the specific task.
How is changeover time measured?
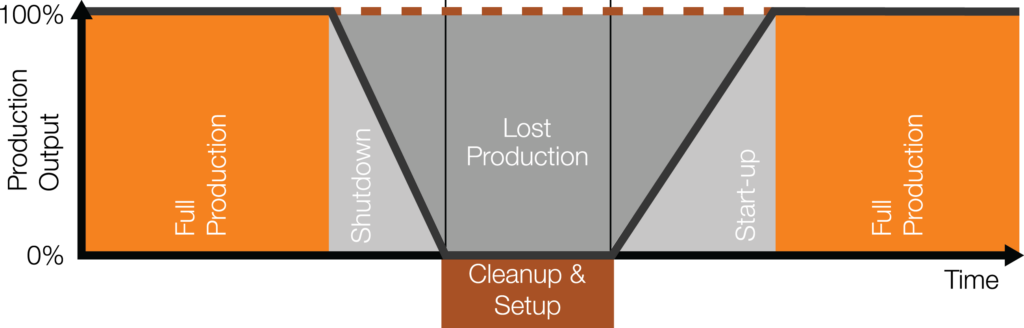
There are a few different stages to a changeover that can be individually measured to best determine how to approach improving the process. These stages are shutdown, cleanup, setup, and start-up.
Shutdown
In the shutdown phase, production is brought to a halt. In an ideal scenario this can happen at a moment’s notice, but in some instances production needs to slow over time before being halted completely. Any leftover material after shutdown is considered waste and impacts total production losses along with cleanup time.
Cleanup
Cleanup is of particular concern in food and beverage production, where cleanliness is vital to avoiding product contamination. A clean-in-place (CIP) system can be used, which is an automated system that cleans food processing equipment without the need for disassembly. However, these systems require an excess of water and detergents that can prove costly. The alternative is to disassemble and clean equipment after shutdown, but this is more time consuming and requires more manual labor.
Setup
Setup is when tooling and process equipment from the previous production run is replaced with the tooling and equipment necessary for the next production run. Incorrect machine adjustments and poor quality of tooling and equipment are some of the biggest causes of lost productivity in this phase.
Start-up
During start-up, the production line is brought back to full speed to begin the next production run. Testing and fine-tuning are required during this stage to achieve the desired quality and throughput. Start-up is responsible for the largest portion of lost productivity across the entire changeover process.
The importance of minimizing changeover time
Changeover time correlates directly to production efficiency. Long changeover times result in lost production time and increased labor costs, and ultimately reduced profits. Some changeovers can take hours to complete, and during this time minimal, if any, product is being produced.
Strategies to minimize changeover time
There’s a wide range of strategies and approaches to take when trying to minimize changeover time. Some of them analyze processes and look for inefficiencies — for example, lean production methods like Kaizen and single-minute exchange of die (SMED). Other methods involve improving equipment directly, either through automation or replacement of key components with improved alternatives.
Kaizen
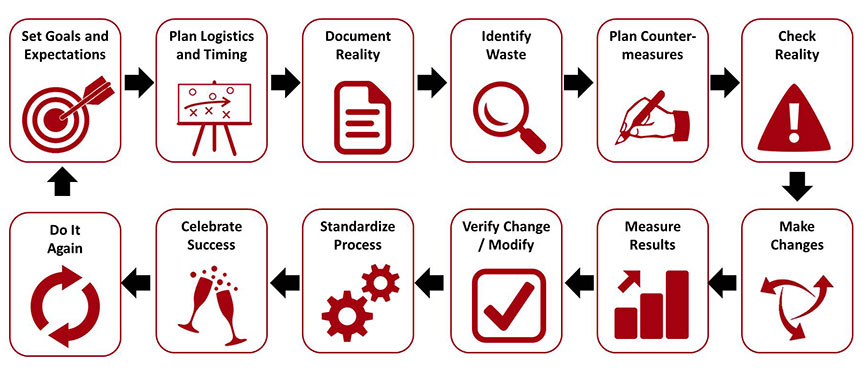
Kaizen is the fundamental idea of continuous improvement that all lean methodologies are based on. Kaizen brings employees from various levels and job functions together to improve a particular process. This is done with incremental changes applied quickly over a short time and sustained over a much longer period.
Kaizen consists of five primary phases, though these can be broken down even further into more specific phases: identification, analysis, planning, implementation, and follow-up. During identification and analysis, the problem is identified and brainstorming begins to understand why the problem exists and how it could be improved.
There are two key methods used in the analysis phase to assess a process and find areas of improvement: five whys, and value stream mapping.
- Five Whys: Developed by Toyota founder Sakichi Toyoda in the 1930s, the five whys process involves asking “why” questions five times to get to the root of a problem. This is best suited for simple or moderately complex problems, though it can be helpful with highly complex problems as well.
- Value Stream Mapping: Value stream mapping involves creating a flowchart that encompasses the process undergoing Kaizen improvement. In writing everything down in an easy-to-follow flowchart, non-value add tasks can be discovered and subsequently removed from the process.
In planning, a cross-functional team is assembled to begin creating a solution to the problem at hand. Each member of the team should have some level of familiarity with the process to be improved and receive training on the Kaizen process before implementation.
Implementation involves putting into place the solution decided upon in the planning stage. This can either be a staggered rollout starting on a small scale and ramping up over time, or a widespread implementation to all relevant areas at once.
Finally, follow-up involves documenting and tracking key performance metrics (KPIs) in the time following the Kaizen event to determine if improvements have been sustained. This is often scheduled for either 30 or 90 days following a Kaizen event. Any feedback for further improvement is noted during follow-up — a key feature of the 5S lean methodology.
Single-minute exchange of die (SMED)
SMED originated with Japanese engineer Shigeo Shingo in 1950. Shingo’s work was remarkably effective in reducing changeover times, achieving an average reduction of 94% across numerous companies.
The primary goal of SMED is to reduce changeover times to less than 10 minutes, though this won’t always be possible depending on the size and scope of the production line. This is achieved by systematically optimizing and streamlining changeovers through a multi-step process.
SMED breaks changeovers down into two types of “elements”, or steps, involved: internal and external. Internal elements are steps that can only be performed when equipment is stopped, while external elements are steps that can be performed while equipment is still running. SMED aims to convert as many internal elements as possible to external elements, while streamlining both.

Streamlining and standardizing the changeover process not only reduces total changeover time, but reduces the likelihood of mistakes being made that can lead to unexpected delays and increases in changeover time.
Implementing automation
Automation is crucial in the effort to reduce changeover times and minimize human error. However, while automation does offer significant benefits, a methodical approach to implementation is necessary for success. Conducting a thorough analysis of the existing process and carefully determining the needs of your application will help ensure smooth implementation.
Robotic systems can be programmed to perform common tasks like tooling changeouts, adjustments, and various setup procedures. These systems can also be integrated with sensors and visions systems to further improve accuracy and reliability, and ultimately streamline the changeover process further.
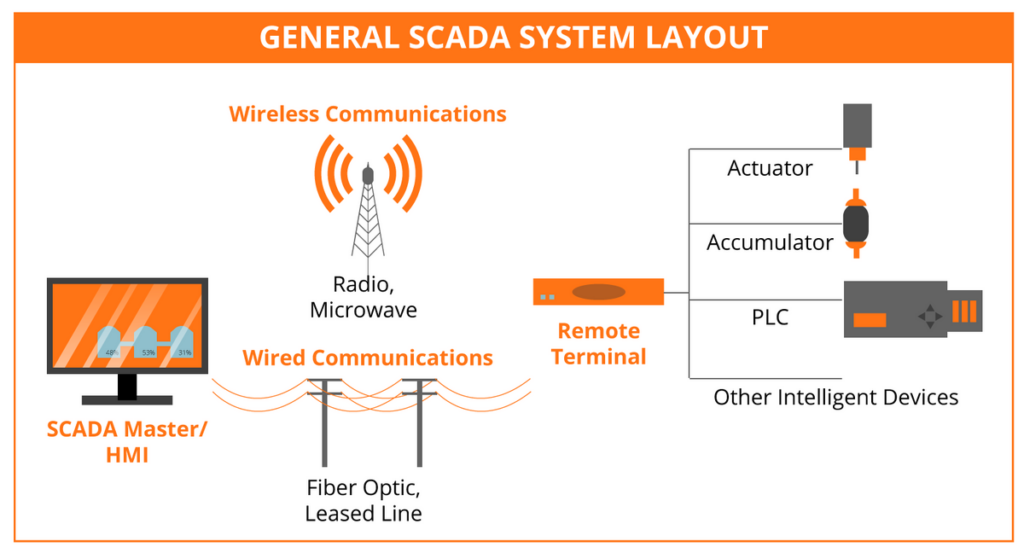
Other computerized control systems, such as supervisory control and data acquisition (SCADA) systems, offer an extremely reliable method of automating changeovers. These systems enable operators to acquire, store, and analyze performance data to uncover abnormal performance early. This helps avoid unplanned downtime and significantly reduce the total amount of downtime for a given packaging line.
Replacing metal components with self-lubricating plastics
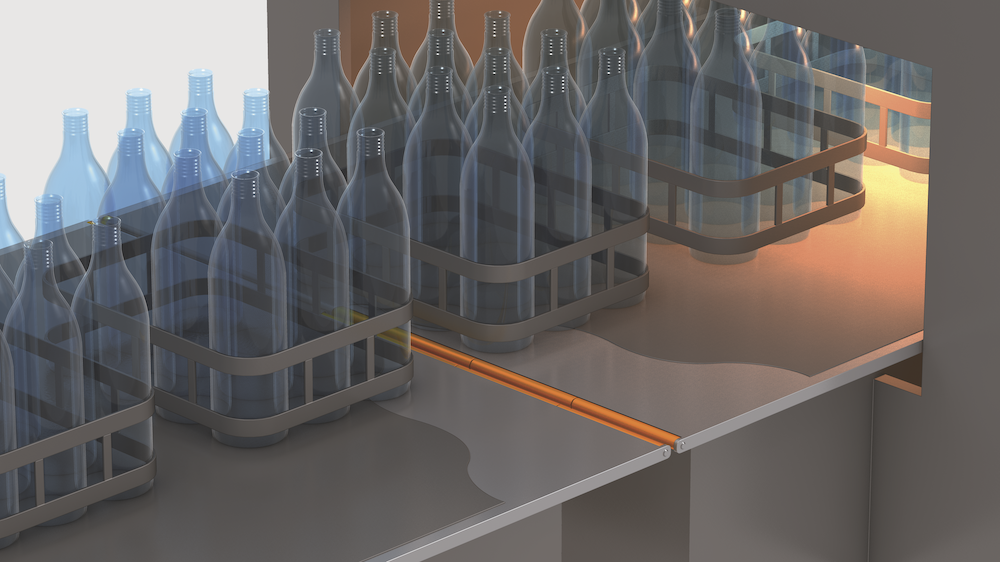
In any packaging line, you’re likely to see metal componentry everywhere. It’s often the go-to material in industrial applications, primarily due to misconceptions around alternatives such as plastics. Yet replacing metal components with plastic alternatives can extend service life, reduce maintenance, and minimize changeover times.
Lead screw assemblies are one particular area where the switch to plastic makes sense in packaging applications. Making the switch allows operators to focus on more important areas of production during changeovers, rather than maintaining and greasing metal lead screw nuts.
To eliminate grease, igus manufactures lead screw nuts made of high-performance polymers. They are designed for dry operation, and solid lubricants have been compounded into the materials. These polymers are therefore self-lubricating, so there’s no need to grease the lead screw nuts. This keeps dirt — such as paper fiber from cartons or corrugated materials — from adhering to them, entering the system and accelerating wear.
Conclusion
Changeovers are often the most stressful element of packaging operations, but they don’t need to be. By incorporating the strategies above and approaching the problem of changeover times holistically, they can be made more streamlined and efficient with relative ease.